前言
💡 首先需要感谢学校为我们提供的一个良好的学习平台,让我们通过毕设来了解项目开发的流程,并通过标准化的书写来规范格式。感谢罗老师的耐心指导和帮助,在实际毕设的写作过程中,关注着我们的每一个节点。
同时需要感谢公司Andawell的支持,能为我提供在公司边实习边做毕设的机会。同时能将毕设与项目开发的标准更好地结合。
最后还需要鼓励自己,因为需要付出很多的努力。
正文
一方面主要是技术上的要求,一方面主要是论文上的排版。然后希望我遇到的问题,也能帮到大家。
word 中 mathtype 公式偏上浮或偏下沉怎么办
刚才遇到了公式上浮的问题,我使用的是 amath 进行公式的编写,搭配图片转 latex 进行调整。然后找到了这个问题的解决办法。感谢 whu 数码君提供的回答。
如何使用图片转 latex
之前有同学问过我这个问题,我今天也再一次遇到了这个问题,看到论文中复杂的公式,一筹莫展怎么办,可以通过图片转 latex 的方式,这是我比较常用的方式,但是现在主流的转 latex 的好的软件不多,在此特别感谢simpletex提供的支持。
关于语病的修改
感谢 up 主:用镜头记录成长,参考论文写作表达语句表达系列课程 一 病句修改 成分残缺_哔哩哔哩_bilibili该视频进行总结。
一、主语残缺
- 滥用介词
从这件小事,说明一个道理
应改为,这件小事说明一个道理。上述例子中缺少主语。
当学生了解了美是什么,就会以美的标准米规范自己的行为和思想。
应去除“当”字。
- 滥用使令动词
通过这件小事,使我明白了一个道理。
去除”通过“二字。
通过对该课题的研究,得出新时代精神的含义。
需添加主语,例如“笔者得出……”(另外还需要尽量避免在论文中使用“我”字)
- 偏正短语缺中心语
课堂教学低效,一直未得到解决。
需在”低效“后面加上”的问题“
我对经济与生活这本教材感到困感。
需在“教材”后面加上“的内容”
- 滥用省略
在经历了几千年的封建统治后,人们又开始重视被禁锯的古典文化,并成为人文主义者的武器,用米反对神权。
应改为”古典文化并成为人文主义者的武器“
- 助词用错
2022 年颁布了《家庭教育指导法》,是我国首部家庭教育法。
把“了”改成“的”
二、谓语残缺
- 句首缺谓另起头
经过几十年的努力,我国己经独立自主地研制、发射、跟踪和测检地球同步通讯卫星的能力。
具备……的能力
某大学工商管理学院在课程设置上除了专业课、外语课、政治理论课,还包括演讲与口才、基础写作等课程,以进一步提高说写方面的技能。
除了设置有…… (第一句话缺少谓语)
- 动宾缺动
我市最近发动了全面的质量大检查运动,要在这个运动中建立与加强技术管理制度等一系列工作。
要在这个运动中完成建立与加强技术管理制度等一系列工作
政府必须严厉打击食品安全违法违规行为的高压态势,及时消除各环节领域的隐患,创新食品安全监管惩处体制机制。
保持严厉打击…
教师在法律专业知识和逻辑思维能力提升方面面临困难。
教师在法律专业知识拓展… (知识和提升搭配不是非常好,搭配知识拓展可能会更好)
三、宾语残缺
- 动宾缺宾
学校宿舍、教学楼等人群密集区,一且发生火灾,后果不堪设想,因此学生掌握火灾中自救互教相当重要。
掌握…技能
- 介宾缺宾
这部电影在塑造人物形象所提供的经验是非常宝贵的,
在…方面
- 误将定语当宾语
桃花乡走可持续发展之路,按照建成生态环境和谐优美、资源集约节约利用、经济和社会协调发展的生态乡,制定了五年发展建设规划。
按照…目标,规划
四、虚词残缺
- 介宾缺介
2014 年底,我国探月工程三期“再入返回飞行”试验获得成功,确保嫦娥五号任务顺利实施和探月工程持续推进莫定坚实基础,
为…奠定坚实基础
- 被动缺被
这本书非常有价值,常常图书馆收藏。
常常被图书馆收藏
- 对象缺对
现代女性越来越独立,她们除了自己独立挣钱外,对自身的价值、生活环境也越发重视,那些价值剥削、性骚扰,她们将说不。
对那些价值剥削、性骚扰,她们将说不。
搭建 yolov5 环境
详细参照 up 主:思绪亦无限的介绍:
然后最主要的还需要引入英伟达的 CUDA,可以现在本地装,但我还是倾向于选择autodl,因为这里已经预装了 cuda 环境。
这里细节很多,但现在又过了好久了,有点忘了,在选择基础镜像的时候就应该要注意选择合适的版本,不然后面配置 cuda 会麻烦死。(看来日志还是要及时记录,当时费了一下午的劲,真是服了)
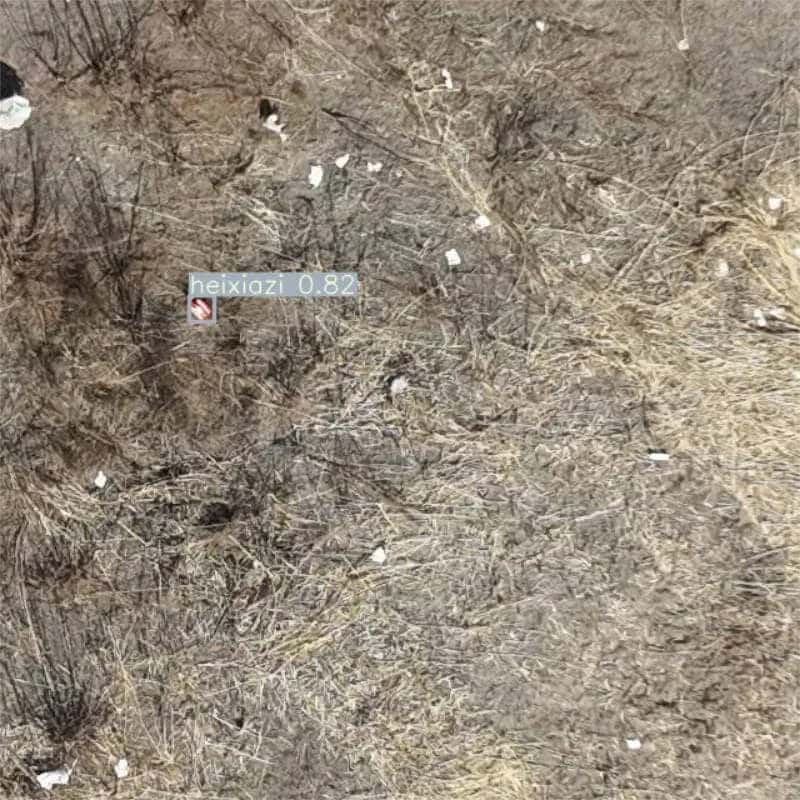
数据集的预处理
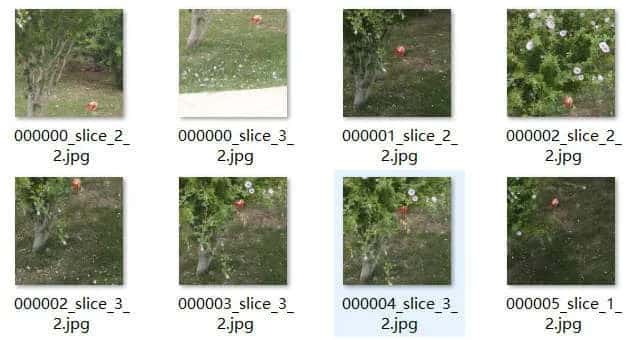
课题中 yolov5 的数据集是采用的航拍视角,在肉眼识别存在困难,还有很多干扰。所以需要预先对数据集进行切片处理。然后挑出切片完后包含黑匣子的图片,再进行标注。
以下是切片程序:
from PIL import Image
import os
import random
#from PIL import Image: 导入Python Imaging Library (PIL) 中的 Image 模块,用于图像处理。
#import os: 导入 os 模块,用于处理文件和目录。
#import random: 导入 random 模块,用于生成随机数。

def slice_and_save_images(input_folder, output_folder, random_size=True, fixed_size=(640, 640), overlap_ratio=0.2):
    #函数的定义,它接收几个参数,包括输入输出文件夹路径、是否随机切片大小、固定切片大小以及重叠比率。
    # 获取输入文件夹中的所有文件
    image_files = [f for f in os.listdir(input_folder) if f.lower().endswith(('.png', '.jpg', '.jpeg', '.bmp'))]

    # 创建输出文件夹
    os.makedirs(output_folder, exist_ok=True)

    # 循环处理每张图像
    for image_file in image_files:
        input_path = os.path.join(input_folder, image_file)

        # 打开图像
        original_image = Image.open(input_path)

        # 获取图像大小
        width, height = original_image.size

        # 随机生成或手动指定切片大小
        #根据 random_size 参数决定是随机生成切片大小还是使用固定大小。随机大小在固定大小的一半到固定大小之间。
        if random_size:
            slice_width = random.randint(fixed_size[0] // 2, fixed_size[0])
            slice_height = random.randint(fixed_size[1] // 2, fixed_size[1])
        else:
            slice_width, slice_height = fixed_size

        # 计算重叠区域大小,由 overlap_ratio 参数决定的。
        overlap_width = int(slice_width * overlap_ratio)
        overlap_height = int(slice_height * overlap_ratio)

        # 计算切片数量
        num_slices_horizontal = (width - overlap_width) // (slice_width - overlap_width)
        num_slices_vertical = (height - overlap_height) // (slice_height - overlap_height)

        # 创建一个文件夹用于保存切片后的小图片
        output_subfolder = os.path.join(output_folder, os.path.splitext(image_file)[0])
        os.makedirs(output_subfolder, exist_ok=True)

        # 切片并保存
        for i in range(num_slices_horizontal):
            for j in range(num_slices_vertical):
                left = i * (slice_width - overlap_width)
                upper = j * (slice_height - overlap_height)
                right = left + slice_width
                lower = upper + slice_height

                # 切片
                slice_image = original_image.crop((left, upper, right, lower))

                # 生成唯一的切片文件名
                slice_filename = f"{os.path.splitext(image_file)[0]}_slice_{j}_{i}.jpg"

                # 保存切片
                slice_image.save(os.path.join(output_subfolder, slice_filename))

# 调用函数,传入输入图像文件夹路径和输出文件夹路径,更换为自己的文件夹
slice_and_save_images(r"C:\Users\Raj\Desktop\bbox", r"C:\Users\Raj\Desktop\bbox全部切片",
                      random_size=False, fixed_size=(640, 640))
切片完成之后,需要挑出包含切片中包含目标对象的图片,之后作为训练集。
验证集
最开始验证集是用的数据集的一部分,但是后面采用新的验证集,难度瞬间就上来了,测试精度从 0.996 瞬间跌到都到不了 0.7。一方面需要扩充数据集,另一方面需要选择合适的模型对网络参数进行调整。
扩充训练集
参考文章:YOLO 数据集实现数据增强的方法(裁剪、平移 、旋转、改变亮度、加噪声等)
数据增强的概念和作用
数据增强是一种重要的机器学习方法之一,是基于已有的训练样本数据来生成更多的训练数据,其目的就是为了使扩增的训练数据尽可能接近真实分布的数据,从而提高检测精度。此外,数据增强能够迫使模型学习到更多鲁棒性的特征,从而有效提高模型的泛化能力。
常见的数据增强的办法
(1)比较常用的几何变换方法主要有: 翻转、旋转、裁剪、缩放、平移、抖动 (2)比较常用的像素变换方法主要有: 加椒盐噪声、高斯噪声、进行高斯模糊、调整 HSV 对比度、调节亮度、饱和度、直方图均衡化、调整白平衡等
具体解释如下:
- 随机裁剪:从原始图像中随机裁剪出一部分,例如裁剪四角、中心或者上下部分等。这种方法能够增加模型的鲁棒性,使其对图像的不同部分都能进行有效的特征提取。
- 翻转或镜像:可以水平翻转或垂直翻转图像。这种方法能够模拟图像在不同视角下的情况,帮助模型学习到更多的特征。
- 旋转:将原图像旋转不同的角度来生成新的样本。需要注意的是,旋转后图像的维度可能会发生变化,因此在处理时需要确保图像尺寸的合理性。
- 亮度或对比度调节:通过改变图像的亮度和对比度,可以模拟不同光照条件下的图像情况,提高模型的适应性。
- 色度调节:改变图像中 R、G、B 颜色分量的比例,从而生成具有不同颜色特征的样本。 饱和度调节:调节图像的饱和度,即改变色彩的纯度。这可以模拟不同颜色鲜艳程度的图像,增加样本的多样性。
- 高斯模糊、锐化、添加噪声:对图像进行这些处理可以模拟图像在采集和传输过程中可能出现的失真情况,有助于提高模型的鲁棒性。 灰度化:将彩色图像转换为灰度图像,可以进一步增加样本的多样性
txt 转 xml
在数据增强的时候,代码是对 xml 进行操作的,所以需要先经历一步,从 txt 到 xml 的过程。
核心原理解释:将 YOLO 格式中的归一化坐标转换为像素坐标。
- 从 YOLO 格式的文本文件中读取每个目标的类别索引和归一化的边界框坐标
(class_index, x_center_norm, y_center_norm, width_norm, height_norm)。 - 将归一化的中心点坐标
(x_center_norm, y_center_norm)和宽度、高度(width_norm, height_norm)转换为像素坐标。 - 使用像素坐标来计算 PASCAL VOC 格式的边界框
(xmin, ymin, xmax, ymax)
核心转换逻辑:
# 计算 PASCAL VOC 的 (xmin, ymin, xmax, ymax)
xmin = int(round(x_center - (width / 2)))
ymin = int(round(y_center - (height / 2)))
xmax = int(round(x_center + (width / 2)))
ymax = int(round(y_center + (height / 2)))
转换代码:
# -*- coding: utf-8 -*-
import os
import cv2
from lxml.etree import Element, SubElement, tostring


def txt_xml(img_path, img_name, txt_path, img_txt, xml_path, img_xml):
    clas = []
    # 读取txt的信息
    txt_img = os.path.join(txt_path, img_txt)

    # 图像的宽度和高度
    imw = 640  # 应当根据实际图片大小进行调整
    imh = 640  # 应当根据实际图片大小进行调整

    with open(txt_img, "r") as f:
        for line in f.readlines():
            line = line.strip('\n')
            list = line.split(" ")
            print(list)
            clas.append(list)

    # 创建XML文档的根节点和相关子节点
        # 创建XML文档的根节点
        node_root = Element('annotation')
        node_folder = SubElement(node_root, 'folder')
        node_folder.text = '1'
        node_filename = SubElement(node_root, 'filename')

        # 图像名称
        node_filename.text = img_name
        node_size = SubElement(node_root, 'size')
        node_width = SubElement(node_size, 'width')
        node_width.text = str(imw)
        node_height = SubElement(node_size, 'height')
        node_height.text = str(imh)
        node_depth = SubElement(node_size, 'depth')
        node_depth.text = '3'

    # 遍历所有的标注信息并添加到XML中
        # 遍历所有的标注信息
        for i in range(len(clas)):
            x_center_norm = float(clas[i][1])
            y_center_norm = float(clas[i][2])
            width_norm = float(clas[i][3])
            height_norm = float(clas[i][4])
            # 转换归一化坐标到像素坐标
            x_center = x_center_norm * imw
            y_center = y_center_norm * imh
            width = width_norm * imw
            height = height_norm * imh
            # 计算并转换为字符串
            xmin = str(int(round(x_center - (width / 2))))
            ymin = str(int(round(y_center - (height / 2))))
            xmax = str(int(round(x_center + (width / 2))))
            ymax = str(int(round(y_center + (height / 2))))

            # 创建XML节点并赋值
            node_object = SubElement(node_root, 'object')
            node_name = SubElement(node_object, 'name')
            node_name.text = str(clas[i][0])
            node_pose = SubElement(node_object, 'pose')
            node_pose.text = "Unspecified"
            node_truncated = SubElement(node_object, 'truncated')
            node_truncated.text = "0"
            node_difficult = SubElement(node_object, 'difficult')
            node_difficult.text = '0'
            node_bndbox = SubElement(node_object, 'bndbox')
            node_xmin = SubElement(node_bndbox, 'xmin')
            node_xmin.text = xmin
            node_ymin = SubElement(node_bndbox, 'ymin')
            node_ymin.text = ymin
            node_xmax = SubElement(node_bndbox, 'xmax')
            node_xmax.text = xmax
            node_ymax = SubElement(node_bndbox, 'ymax')
            node_ymax.text = ymax

    # 将XML内容写入文件
    xml = tostring(node_root, pretty_print=True)
    img_newxml = os.path.join(xml_path, img_xml)
    with open(img_newxml, 'wb') as file_object:
        file_object.write(xml)


if __name__ == "__main__":
    # 图像、标注和XML文件夹所在位置、更换自己的绝对路径
    img_path = r"D:\@Graduation\enhance\data\images\train"
    txt_path = r"D:\@Graduation\enhance\data\labels\train"
    xml_path = r"D:\@Graduation\enhance\data\labels\xml"
    for img_name in os.listdir(img_path):
        img_base_name = os.path.splitext(img_name)[0]
        img_xml = img_base_name + ".xml"
        img_txt = img_base_name + ".txt"
        txt_xml(img_path, img_name, txt_path, img_txt, xml_path, img_xml)
例如,这就是标注后的归一化坐标
0 0.719594 0.901037 0.108083 0.091896
这就是转换后的 xml 坐标和其他的一些元素,转换完可以用 labelimg 验证一下
<annotation>
  <folder>1</folder>
  <filename>000000_slice_2_2.jpg</filename>
  <size>
    <width>640</width>
    <height>640</height>
    <depth>3</depth>
  </size>
  <object>
    <name>0</name>
    <pose>Unspecified</pose>
    <truncated>0</truncated>
    <difficult>0</difficult>
    <bndbox>
      <xmin>426</xmin>
      <ymin>547</ymin>
      <xmax>495</xmax>
      <ymax>606</ymax>
    </bndbox>
  </object>
</annotation>
数据集扩充
根据上述分析的方式进行数据集扩充
# -*- coding=utf-8 -*-

import time
import random
import copy
import cv2
import os
import math
import numpy as np
from skimage.util import random_noise
from lxml import etree, objectify
import xml.etree.ElementTree as ET
import argparse


# 显示图片
def show_pic(img, bboxes=None):
    '''
    输入:
        img:图像array
        bboxes:图像的所有boudning box list, 格式为[[x_min, y_min, x_max, y_max]....]
        names:每个box对应的名称
    '''
    for i in range(len(bboxes)):
        bbox = bboxes[i]
        x_min = bbox[0]
        y_min = bbox[1]
        x_max = bbox[2]
        y_max = bbox[3]
        cv2.rectangle(img, (int(x_min), int(y_min)), (int(x_max), int(y_max)), (0, 255, 0), 3)
    cv2.namedWindow('pic', 0)  # 1表示原图
    cv2.moveWindow('pic', 0, 0)
    cv2.resizeWindow('pic', 1200, 800)  # 可视化的图片大小
    cv2.imshow('pic', img)
    cv2.waitKey(0)
    cv2.destroyAllWindows()


# 图像均为cv2读取
class DataAugmentForObjectDetection():
    def __init__(self, rotation_rate=0.5, max_rotation_angle=5,
                 crop_rate=0.5, shift_rate=0.5, change_light_rate=0.5,
                 add_noise_rate=0.5, flip_rate=0.5,
                 cutout_rate=0.5, cut_out_length=50, cut_out_holes=1, cut_out_threshold=0.5,
                 is_addNoise=True, is_changeLight=True, is_cutout=True, is_rotate_img_bbox=True,
                 is_crop_img_bboxes=True, is_shift_pic_bboxes=True, is_filp_pic_bboxes=True):

        # 配置各个操作的属性
        self.rotation_rate = rotation_rate
        self.max_rotation_angle = max_rotation_angle
        self.crop_rate = crop_rate
        self.shift_rate = shift_rate
        self.change_light_rate = change_light_rate
        self.add_noise_rate = add_noise_rate
        self.flip_rate = flip_rate
        self.cutout_rate = cutout_rate

        self.cut_out_length = cut_out_length
        self.cut_out_holes = cut_out_holes
        self.cut_out_threshold = cut_out_threshold

        # 是否使用某种增强方式
        self.is_addNoise = is_addNoise
        self.is_changeLight = is_changeLight
        self.is_cutout = is_cutout
        self.is_rotate_img_bbox = is_rotate_img_bbox
        self.is_crop_img_bboxes = is_crop_img_bboxes
        self.is_shift_pic_bboxes = is_shift_pic_bboxes
        self.is_filp_pic_bboxes = is_filp_pic_bboxes

    # ----1.加噪声---- #
    def _addNoise(self, img):
        '''
        输入:
            img:图像array
        输出:
            加噪声后的图像array,由于输出的像素是在[0,1]之间,所以得乘以255
        '''
        # return cv2.GaussianBlur(img, (11, 11), 0)
        return random_noise(img, mode='gaussian', seed=int(time.time()), clip=True) * 255

    # ---2.调整亮度--- #
    def _changeLight(self, img):
        alpha = random.uniform(0.35, 1)
        blank = np.zeros(img.shape, img.dtype)
        return cv2.addWeighted(img, alpha, blank, 1 - alpha, 0)

    # ---3.cutout--- #
    def _cutout(self, img, bboxes, length=100, n_holes=1, threshold=0.5):
        '''
        原版本:https://github.com/uoguelph-mlrg/Cutout/blob/master/util/cutout.py
        Randomly mask out one or more patches from an image.
        Args:
            img : a 3D numpy array,(h,w,c)
            bboxes : 框的坐标
            n_holes (int): Number of patches to cut out of each image.
            length (int): The length (in pixels) of each square patch.
        '''

        def cal_iou(boxA, boxB):
            '''
            boxA, boxB为两个框,返回iou
            boxB为bouding box
            '''
            # determine the (x, y)-coordinates of the intersection rectangle
            xA = max(boxA[0], boxB[0])
            yA = max(boxA[1], boxB[1])
            xB = min(boxA[2], boxB[2])
            yB = min(boxA[3], boxB[3])

            if xB <= xA or yB <= yA:
                return 0.0

            # compute the area of intersection rectangle
            interArea = (xB - xA + 1) * (yB - yA + 1)

            # compute the area of both the prediction and ground-truth
            # rectangles
            boxAArea = (boxA[2] - boxA[0] + 1) * (boxA[3] - boxA[1] + 1)
            boxBArea = (boxB[2] - boxB[0] + 1) * (boxB[3] - boxB[1] + 1)
            iou = interArea / float(boxBArea)
            return iou

        # 得到h和w
        if img.ndim == 3:
            h, w, c = img.shape
        else:
            _, h, w, c = img.shape
        mask = np.ones((h, w, c), np.float32)
        for n in range(n_holes):
            chongdie = True  # 看切割的区域是否与box重叠太多
            while chongdie:
                y = np.random.randint(h)
                x = np.random.randint(w)

                y1 = np.clip(y - length // 2, 0,
                             h)  # numpy.clip(a, a_min, a_max, out=None), clip这个函数将将数组中的元素限制在a_min, a_max之间,大于a_max的就使得它等于 a_max,小于a_min,的就使得它等于a_min
                y2 = np.clip(y + length // 2, 0, h)
                x1 = np.clip(x - length // 2, 0, w)
                x2 = np.clip(x + length // 2, 0, w)

                chongdie = False
                for box in bboxes:
                    if cal_iou([x1, y1, x2, y2], box) > threshold:
                        chongdie = True
                        break
            mask[y1: y2, x1: x2, :] = 0.
        img = img * mask
        return img

    # ---4.旋转--- #
    def _rotate_img_bbox(self, img, bboxes, angle=5, scale=1.):
        '''
        参考:https://blog.csdn.net/u014540717/article/details/53301195crop_rate
        输入:
            img:图像array,(h,w,c)
            bboxes:该图像包含的所有boundingboxs,一个list,每个元素为[x_min, y_min, x_max, y_max],要确保是数值
            angle:旋转角度
            scale:默认1
        输出:
            rot_img:旋转后的图像array
            rot_bboxes:旋转后的boundingbox坐标list
        '''
        # 旋转图像
        w = img.shape[1]
        h = img.shape[0]
        # 角度变弧度
        rangle = np.deg2rad(angle)  # angle in radians
        # now calculate new image width and height
        nw = (abs(np.sin(rangle) * h) + abs(np.cos(rangle) * w)) * scale
        nh = (abs(np.cos(rangle) * h) + abs(np.sin(rangle) * w)) * scale
        # ask OpenCV for the rotation matrix
        rot_mat = cv2.getRotationMatrix2D((nw * 0.5, nh * 0.5), angle, scale)
        # calculate the move from the old center to the new center combined
        # with the rotation
        rot_move = np.dot(rot_mat, np.array([(nw - w) * 0.5, (nh - h) * 0.5, 0]))
        # the move only affects the translation, so update the translation
        rot_mat[0, 2] += rot_move[0]
        rot_mat[1, 2] += rot_move[1]
        # 仿射变换
        rot_img = cv2.warpAffine(img, rot_mat, (int(math.ceil(nw)), int(math.ceil(nh))), flags=cv2.INTER_LANCZOS4)

        # 矫正bbox坐标
        # rot_mat是最终的旋转矩阵
        # 获取原始bbox的四个中点,然后将这四个点转换到旋转后的坐标系下
        rot_bboxes = list()
        for bbox in bboxes:
            xmin = bbox[0]
            ymin = bbox[1]
            xmax = bbox[2]
            ymax = bbox[3]
            point1 = np.dot(rot_mat, np.array([(xmin + xmax) / 2, ymin, 1]))
            point2 = np.dot(rot_mat, np.array([xmax, (ymin + ymax) / 2, 1]))
            point3 = np.dot(rot_mat, np.array([(xmin + xmax) / 2, ymax, 1]))
            point4 = np.dot(rot_mat, np.array([xmin, (ymin + ymax) / 2, 1]))
            # 合并np.array
            concat = np.vstack((point1, point2, point3, point4))
            # 改变array类型
            concat = concat.astype(np.int32)
            # 得到旋转后的坐标
            rx, ry, rw, rh = cv2.boundingRect(concat)
            rx_min = rx
            ry_min = ry
            rx_max = rx + rw
            ry_max = ry + rh
            # 加入list中
            rot_bboxes.append([rx_min, ry_min, rx_max, ry_max])

        return rot_img, rot_bboxes

    # ---5.裁剪--- #
    def _crop_img_bboxes(self, img, bboxes):
        '''
        裁剪后的图片要包含所有的框
        输入:
            img:图像array
            bboxes:该图像包含的所有boundingboxs,一个list,每个元素为[x_min, y_min, x_max, y_max],要确保是数值
        输出:
            crop_img:裁剪后的图像array
            crop_bboxes:裁剪后的bounding box的坐标list
        '''
        # 裁剪图像
        w = img.shape[1]
        h = img.shape[0]
        x_min = w  # 裁剪后的包含所有目标框的最小的框
        x_max = 0
        y_min = h
        y_max = 0
        for bbox in bboxes:
            x_min = min(x_min, bbox[0])
            y_min = min(y_min, bbox[1])
            x_max = max(x_max, bbox[2])
            y_max = max(y_max, bbox[3])

        d_to_left = x_min  # 包含所有目标框的最小框到左边的距离
        d_to_right = w - x_max  # 包含所有目标框的最小框到右边的距离
        d_to_top = y_min  # 包含所有目标框的最小框到顶端的距离
        d_to_bottom = h - y_max  # 包含所有目标框的最小框到底部的距离

        # 随机扩展这个最小框
        crop_x_min = int(x_min - random.uniform(0, d_to_left))
        crop_y_min = int(y_min - random.uniform(0, d_to_top))
        crop_x_max = int(x_max + random.uniform(0, d_to_right))
        crop_y_max = int(y_max + random.uniform(0, d_to_bottom))

        # 随机扩展这个最小框 , 防止别裁的太小
        # crop_x_min = int(x_min - random.uniform(d_to_left//2, d_to_left))
        # crop_y_min = int(y_min - random.uniform(d_to_top//2, d_to_top))
        # crop_x_max = int(x_max + random.uniform(d_to_right//2, d_to_right))
        # crop_y_max = int(y_max + random.uniform(d_to_bottom//2, d_to_bottom))

        # 确保不要越界
        crop_x_min = max(0, crop_x_min)
        crop_y_min = max(0, crop_y_min)
        crop_x_max = min(w, crop_x_max)
        crop_y_max = min(h, crop_y_max)

        crop_img = img[crop_y_min:crop_y_max, crop_x_min:crop_x_max]

        # 裁剪boundingbox
        # 裁剪后的boundingbox坐标计算
        crop_bboxes = list()
        for bbox in bboxes:
            crop_bboxes.append([bbox[0] - crop_x_min, bbox[1] - crop_y_min, bbox[2] - crop_x_min, bbox[3] - crop_y_min])

        return crop_img, crop_bboxes

    # ---6.平移--- #
    def _shift_pic_bboxes(self, img, bboxes):
        '''
        平移后的图片要包含所有的框
        输入:
            img:图像array
            bboxes:该图像包含的所有boundingboxs,一个list,每个元素为[x_min, y_min, x_max, y_max],要确保是数值
        输出:
            shift_img:平移后的图像array
            shift_bboxes:平移后的bounding box的坐标list
        '''
        # 平移图像
        w = img.shape[1]
        h = img.shape[0]
        x_min = w  # 裁剪后的包含所有目标框的最小的框
        x_max = 0
        y_min = h
        y_max = 0
        for bbox in bboxes:
            x_min = min(x_min, bbox[0])
            y_min = min(y_min, bbox[1])
            x_max = max(x_max, bbox[2])
            y_max = max(y_max, bbox[3])

        d_to_left = x_min  # 包含所有目标框的最大左移动距离
        d_to_right = w - x_max  # 包含所有目标框的最大右移动距离
        d_to_top = y_min  # 包含所有目标框的最大上移动距离
        d_to_bottom = h - y_max  # 包含所有目标框的最大下移动距离

        x = random.uniform(-(d_to_left - 1) / 3, (d_to_right - 1) / 3)
        y = random.uniform(-(d_to_top - 1) / 3, (d_to_bottom - 1) / 3)

        M = np.float32([[1, 0, x], [0, 1, y]])  # x为向左或右移动的像素值,正为向右负为向左; y为向上或者向下移动的像素值,正为向下负为向上
        shift_img = cv2.warpAffine(img, M, (img.shape[1], img.shape[0]))

        #  平移boundingbox
        shift_bboxes = list()
        for bbox in bboxes:
            shift_bboxes.append([bbox[0] + x, bbox[1] + y, bbox[2] + x, bbox[3] + y])

        return shift_img, shift_bboxes

    # ---7.镜像--- #
    def _filp_pic_bboxes(self, img, bboxes):
        '''
            平移后的图片要包含所有的框
            输入:
                img:图像array
                bboxes:该图像包含的所有boundingboxs,一个list,每个元素为[x_min, y_min, x_max, y_max],要确保是数值
            输出:
                flip_img:平移后的图像array
                flip_bboxes:平移后的bounding box的坐标list
        '''
        # 翻转图像

        flip_img = copy.deepcopy(img)
        h, w, _ = img.shape

        sed = random.random()

        if 0 < sed < 0.33:  # 0.33的概率水平翻转,0.33的概率垂直翻转,0.33是对角反转
            flip_img = cv2.flip(flip_img, 0)  # _flip_x
            inver = 0
        elif 0.33 < sed < 0.66:
            flip_img = cv2.flip(flip_img, 1)  # _flip_y
            inver = 1
        else:
            flip_img = cv2.flip(flip_img, -1)  # flip_x_y
            inver = -1

        # 调整boundingbox
        flip_bboxes = list()
        for box in bboxes:
            x_min = box[0]
            y_min = box[1]
            x_max = box[2]
            y_max = box[3]

            if inver == 0:
                # 0:垂直翻转
                flip_bboxes.append([x_min, h - y_max, x_max, h - y_min])
            elif inver == 1:
                # 1:水平翻转
                flip_bboxes.append([w - x_max, y_min, w - x_min, y_max])
            elif inver == -1:
                # -1:水平垂直翻转
                flip_bboxes.append([w - x_max, h - y_max, w - x_min, h - y_min])
        return flip_img, flip_bboxes

    # 图像增强方法
    def dataAugment(self, img, bboxes):
        '''
        图像增强
        输入:
            img:图像array
            bboxes:该图像的所有框坐标
        输出:
            img:增强后的图像
            bboxes:增强后图片对应的box
        '''
        change_num = 0  # 改变的次数
        # print('------')
        while change_num < 1:  # 默认至少有一种数据增强生效

            if self.is_rotate_img_bbox:
                if random.random() > self.rotation_rate:  # 旋转
                    change_num += 1
                    angle = random.uniform(-self.max_rotation_angle, self.max_rotation_angle)
                    scale = random.uniform(0.7, 0.8)
                    img, bboxes = self._rotate_img_bbox(img, bboxes, angle, scale)

            if self.is_shift_pic_bboxes:
                if random.random() < self.shift_rate:  # 平移
                    change_num += 1
                    img, bboxes = self._shift_pic_bboxes(img, bboxes)

            if self.is_changeLight:
                if random.random() > self.change_light_rate:  # 改变亮度
                    change_num += 1
                    img = self._changeLight(img)

            if self.is_addNoise:
                if random.random() < self.add_noise_rate:  # 加噪声
                    change_num += 1
                    img = self._addNoise(img)
            if self.is_cutout:
                if random.random() < self.cutout_rate:  # cutout
                    change_num += 1
                    img = self._cutout(img, bboxes, length=self.cut_out_length, n_holes=self.cut_out_holes,
                                       threshold=self.cut_out_threshold)
            if self.is_filp_pic_bboxes:
                if random.random() < self.flip_rate:  # 翻转
                    change_num += 1
                    img, bboxes = self._filp_pic_bboxes(img, bboxes)

        return img, bboxes


# xml解析工具
class ToolHelper():
    # 从xml文件中提取bounding box信息, 格式为[[x_min, y_min, x_max, y_max, name]]
    def parse_xml(self, path):
        '''
        输入:
            xml_path: xml的文件路径
        输出:
            从xml文件中提取bounding box信息, 格式为[[x_min, y_min, x_max, y_max, name]]
        '''
        tree = ET.parse(path)
        root = tree.getroot()
        objs = root.findall('object')
        coords = list()
        for ix, obj in enumerate(objs):
            name = obj.find('name').text
            box = obj.find('bndbox')
            x_min = int(box[0].text)
            y_min = int(box[1].text)
            x_max = int(box[2].text)
            y_max = int(box[3].text)
            coords.append([x_min, y_min, x_max, y_max, name])
        return coords

    # 保存图片结果
    def save_img(self, file_name, save_folder, img):
        cv2.imwrite(os.path.join(save_folder, file_name), img)

    # 保持xml结果
    def save_xml(self, file_name, save_folder, img_info, height, width, channel, bboxs_info):
        '''
        :param file_name:文件名
        :param save_folder:#保存的xml文件的结果
        :param height:图片的信息
        :param width:图片的宽度
        :param channel:通道
        :return:
        '''
        folder_name, img_name = img_info  # 得到图片的信息

        E = objectify.ElementMaker(annotate=False)

        anno_tree = E.annotation(
            E.folder(folder_name),
            E.filename(img_name),
            E.path(os.path.join(folder_name, img_name)),
            E.source(
                E.database('Unknown'),
            ),
            E.size(
                E.width(width),
                E.height(height),
                E.depth(channel)
            ),
            E.segmented(0),
        )

        labels, bboxs = bboxs_info  # 得到边框和标签信息
        for label, box in zip(labels, bboxs):
            anno_tree.append(
                E.object(
                    E.name(label),
                    E.pose('Unspecified'),
                    E.truncated('0'),
                    E.difficult('0'),
                    E.bndbox(
                        E.xmin(box[0]),
                        E.ymin(box[1]),
                        E.xmax(box[2]),
                        E.ymax(box[3])
                    )
                ))

        etree.ElementTree(anno_tree).write(os.path.join(save_folder, file_name), pretty_print=True)


if __name__ == '__main__':

    need_aug_num = 5  # 每张图片需要增强的次数

    is_endwidth_dot = True  # 文件是否以.jpg或者png结尾

    dataAug = DataAugmentForObjectDetection()  # 数据增强工具类

    toolhelper = ToolHelper()  # 工具

    # 获取相关参数
    parser = argparse.ArgumentParser()
    parser.add_argument('--source_img_path', type=str, default='D:\@Graduation\enhance\images')
    parser.add_argument('--source_xml_path', type=str, default='D:\@Graduation\enhance\labels')
    parser.add_argument('--save_img_path', type=str, default='D:\@Graduation\enhance\images2')
    parser.add_argument('--save_xml_path', type=str, default='D:\@Graduation\enhance\Annotations2')
    args = parser.parse_args()
    source_img_path = args.source_img_path  # 图片原始位置
    source_xml_path = args.source_xml_path  # xml的原始位置

    save_img_path = args.save_img_path  # 图片增强结果保存文件
    save_xml_path = args.save_xml_path  # xml增强结果保存文件

    # 如果保存文件夹不存在就创建
    if not os.path.exists(save_img_path):
        os.mkdir(save_img_path)

    if not os.path.exists(save_xml_path):
        os.mkdir(save_xml_path)

    for parent, _, files in os.walk(source_img_path):
        files.sort()
        for file in files:
            cnt = 0
            pic_path = os.path.join(parent, file)
            xml_path = os.path.join(source_xml_path, file[:-4] + '.xml')
            values = toolhelper.parse_xml(xml_path)  # 解析得到box信息,格式为[[x_min,y_min,x_max,y_max,name]]
            coords = [v[:4] for v in values]  # 得到框
            labels = [v[-1] for v in values]  # 对象的标签

            # 如果图片是有后缀的
            if is_endwidth_dot:
                # 找到文件的最后名字
                dot_index = file.rfind('.')
                _file_prefix = file[:dot_index]  # 文件名的前缀
                _file_suffix = file[dot_index:]  # 文件名的后缀
            img = cv2.imread(pic_path)

            # show_pic(img, coords)  # 显示原图
            while cnt < need_aug_num:  # 继续增强
                auged_img, auged_bboxes = dataAug.dataAugment(img, coords)
                auged_bboxes_int = np.array(auged_bboxes).astype(np.int32)
                height, width, channel = auged_img.shape  # 得到图片的属性
                img_name = '{}_{}{}'.format(_file_prefix, cnt + 1, _file_suffix)  # 图片保存的信息
                toolhelper.save_img(img_name, save_img_path,
                                    auged_img)  # 保存增强图片

                toolhelper.save_xml('{}_{}.xml'.format(_file_prefix, cnt + 1),
                                    save_xml_path, (save_img_path, img_name), height, width, channel,
                                    (labels, auged_bboxes_int))  # 保存xml文件
                # show_pic(auged_img, auged_bboxes)  # 强化后的图
                print(img_name)
                cnt += 1  # 继续增强下一张
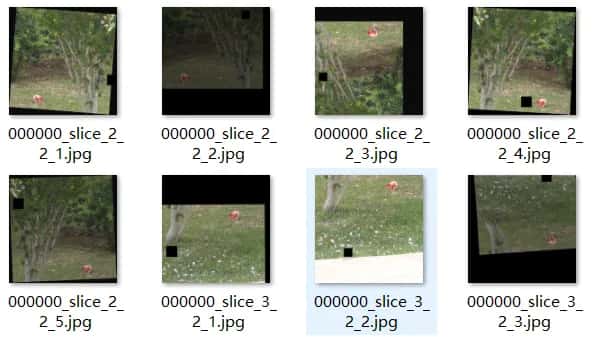
这是扩充数据集后的效果图:
接下来需要对扩充好的数据集进行 xml 转 txt:
import xml.etree.ElementTree as ET
import os
from os import getcwd
import glob

# 1.
# 自己创建文件夹,例如:label_mal label_txt  也可以修改别的
image_set = 'xml'  # 需要转换的文件夹名称(文件夹内放xml标签文件)
imageset2 = 'labels2'  # 保存txt的文件夹
# 2.
# 换成你的类别 当前的顺序,就txt 0,1,2,3 四个类别
classes = ['0']  # 标注时的标签 注意顺序一定不要错。

# 3.
# # 转换文件夹的绝对路径
# data_dir = 'D:/detectAuto_/data'
# 或者 读取当前路径
data_dir = getcwd()  # 当前路径


'''
xml中框的左上角坐标和右下角坐标(x1,y1,x2,y2)
》》txt中的中心点坐标和宽和高(x,y,w,h),并且归一化
'''


def convert(size, box):
    dw = 1. / size[0]
    dh = 1. / size[1]
    x = (box[0] + box[1]) / 2.0
    y = (box[2] + box[3]) / 2.0
    w = box[1] - box[0]
    h = box[3] - box[2]
    x = x * dw
    w = w * dw
    y = y * dh
    h = h * dh
    return (x, y, w, h)


def convert_annotation(data_dir, imageset1, imageset2, image_id):
    in_file = open(data_dir + '/%s/%s.xml' % (imageset1, image_id),encoding='UTF-8')  # 读取xml
    out_file = open(data_dir + '/%s/%s.txt' % (imageset2, image_id), 'w',encoding='UTF-8')  # 保存txt

    tree = ET.parse(in_file)
    root = tree.getroot()
    size = root.find('size')
    w = int(size.find('width').text)
    h = int(size.find('height').text)
    for obj in root.iter('object'):
        difficult = obj.find('difficult').text
        cls = obj.find('name').text
        if cls not in classes or int(difficult) == 1:
            continue
        cls_id = classes.index(cls)  # 获取类别索引
        xmlbox = obj.find('bndbox')
        b = (float(xmlbox.find('xmin').text), float(xmlbox.find('xmax').text), float(xmlbox.find('ymin').text),
             float(xmlbox.find('ymax').text))
        bb = convert((w, h), b)
        out_file.write(str(cls_id) + " " + " ".join([str('%.6f' % a) for a in bb]) + '\n')


image_ids = []
for x in glob.glob(data_dir + '/%s' % image_set + '/*.xml'):
    image_ids.append(os.path.basename(x)[:-4])
print('\n%s数量:' % image_set, len(image_ids))  # 确认数量
i = 0
for image_id in image_ids:
    i = i + 1
    convert_annotation(data_dir, image_set, imageset2, image_id)
    print("%s 数据:%s/%s文件完成!" % (image_set, i, len(image_ids)))

print("Done!!!")
然后打包好数据集上传服务器
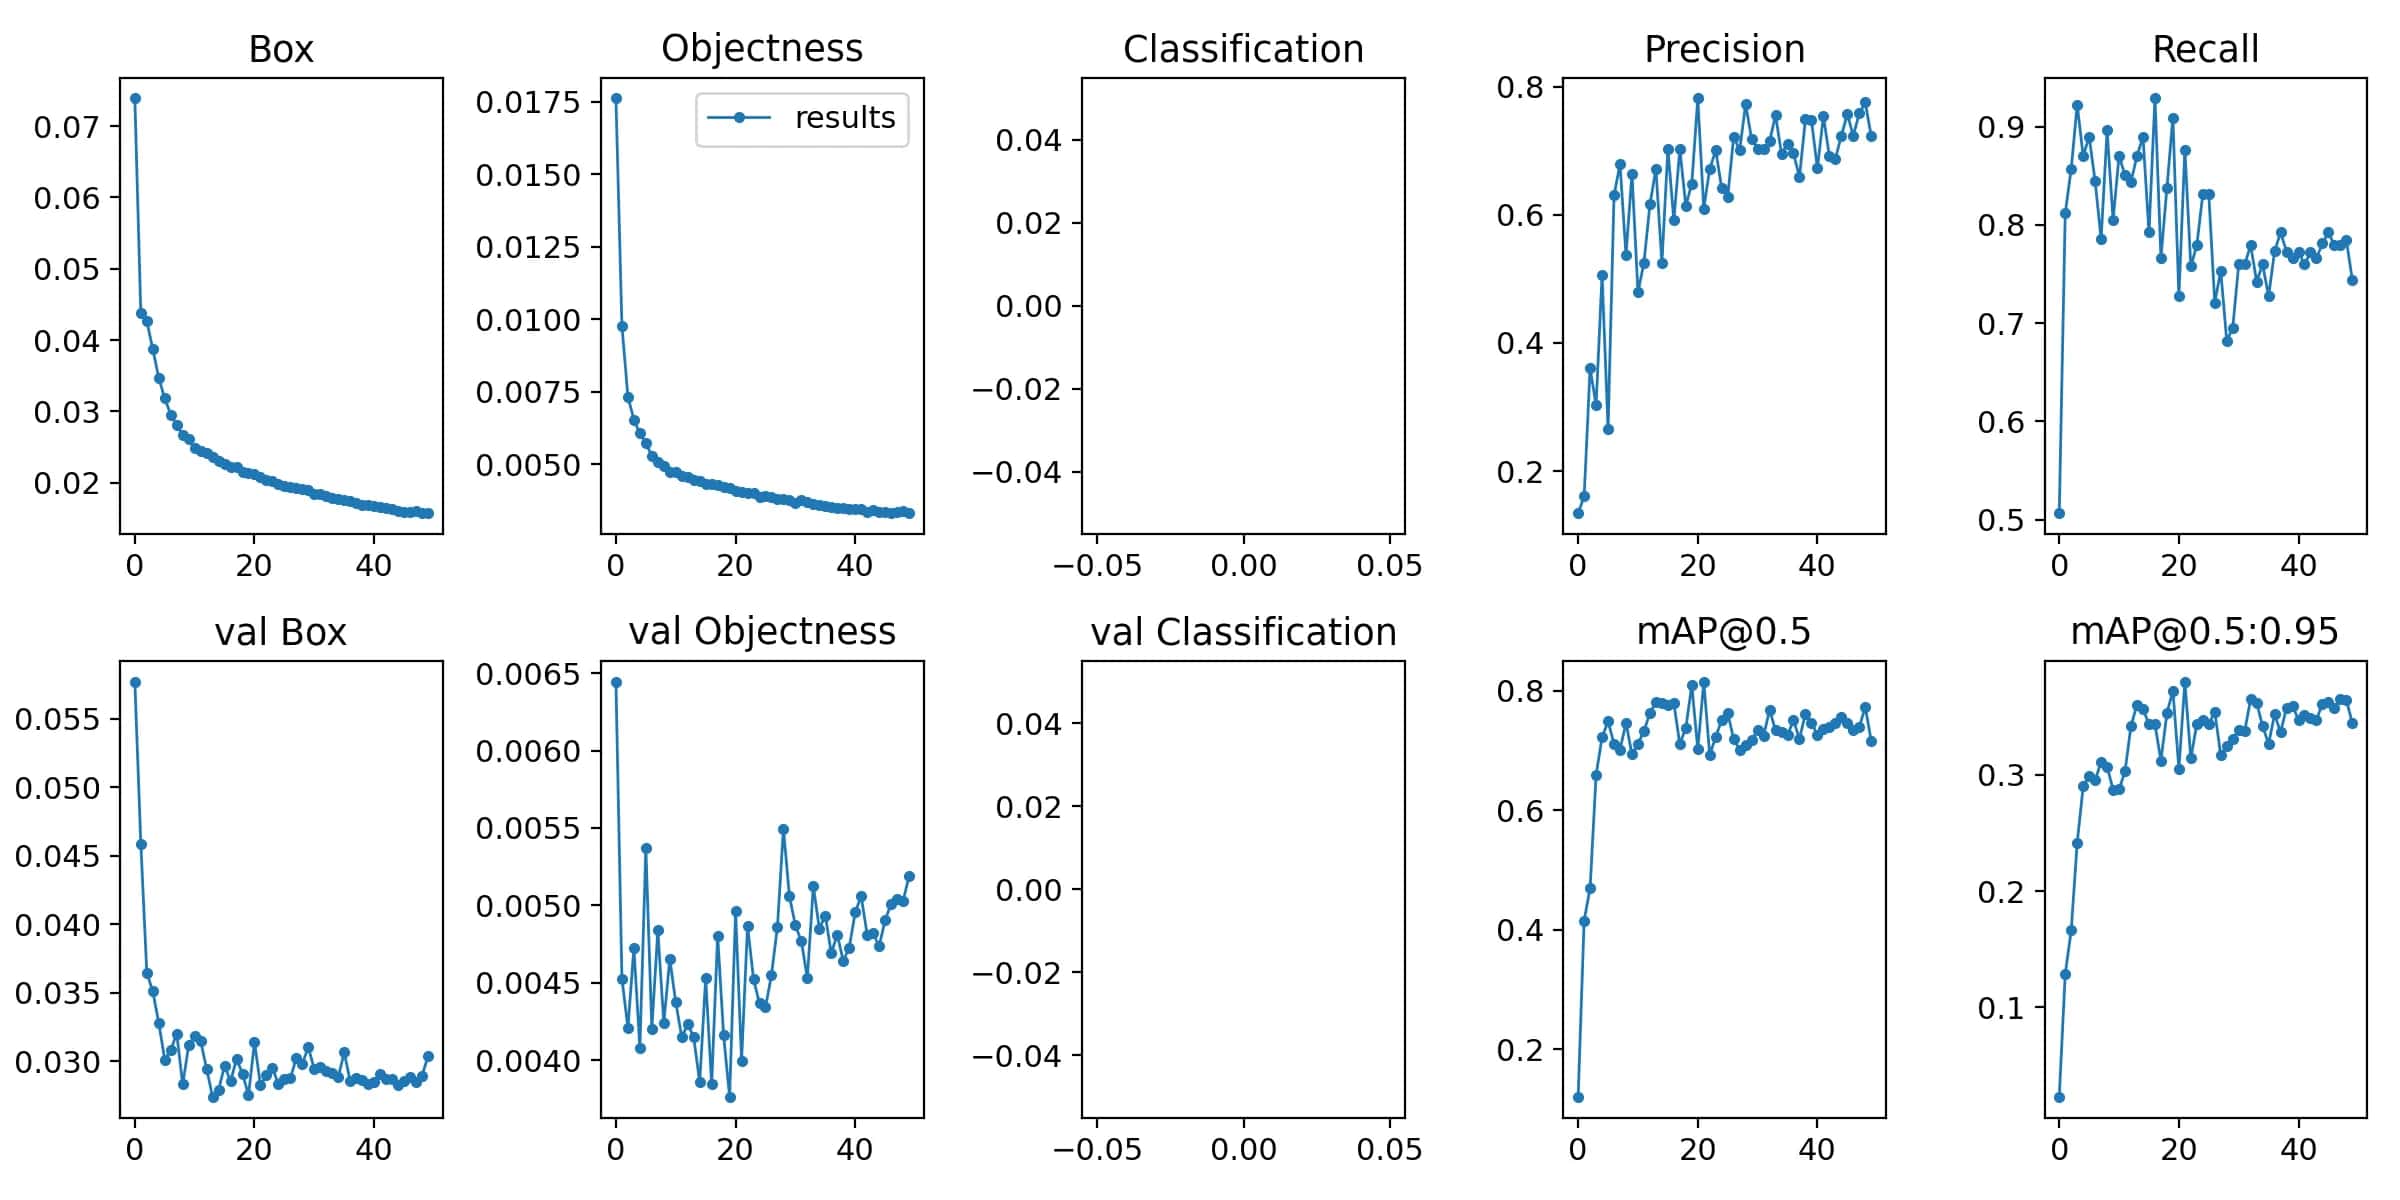
Autodl 训练效果
由于引入了数据集进行扩充后,图片的数量增多,训练时间也更长。
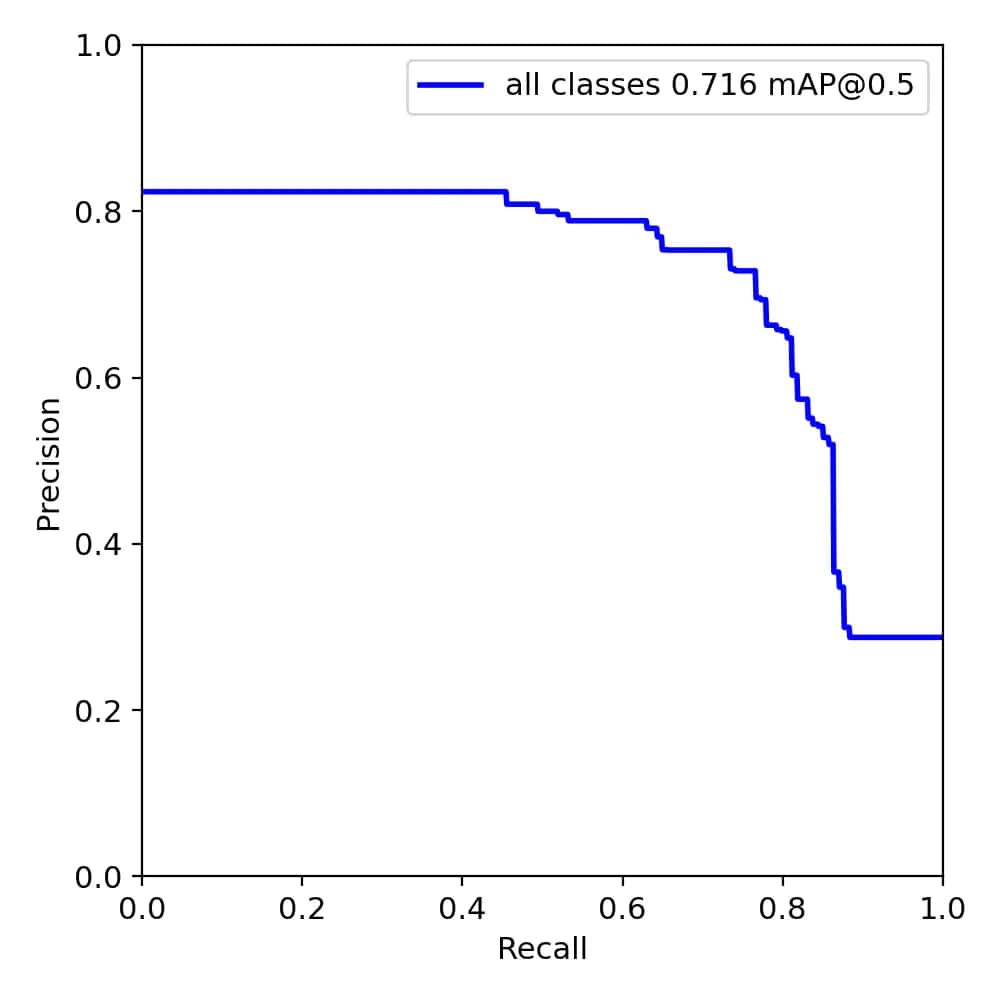
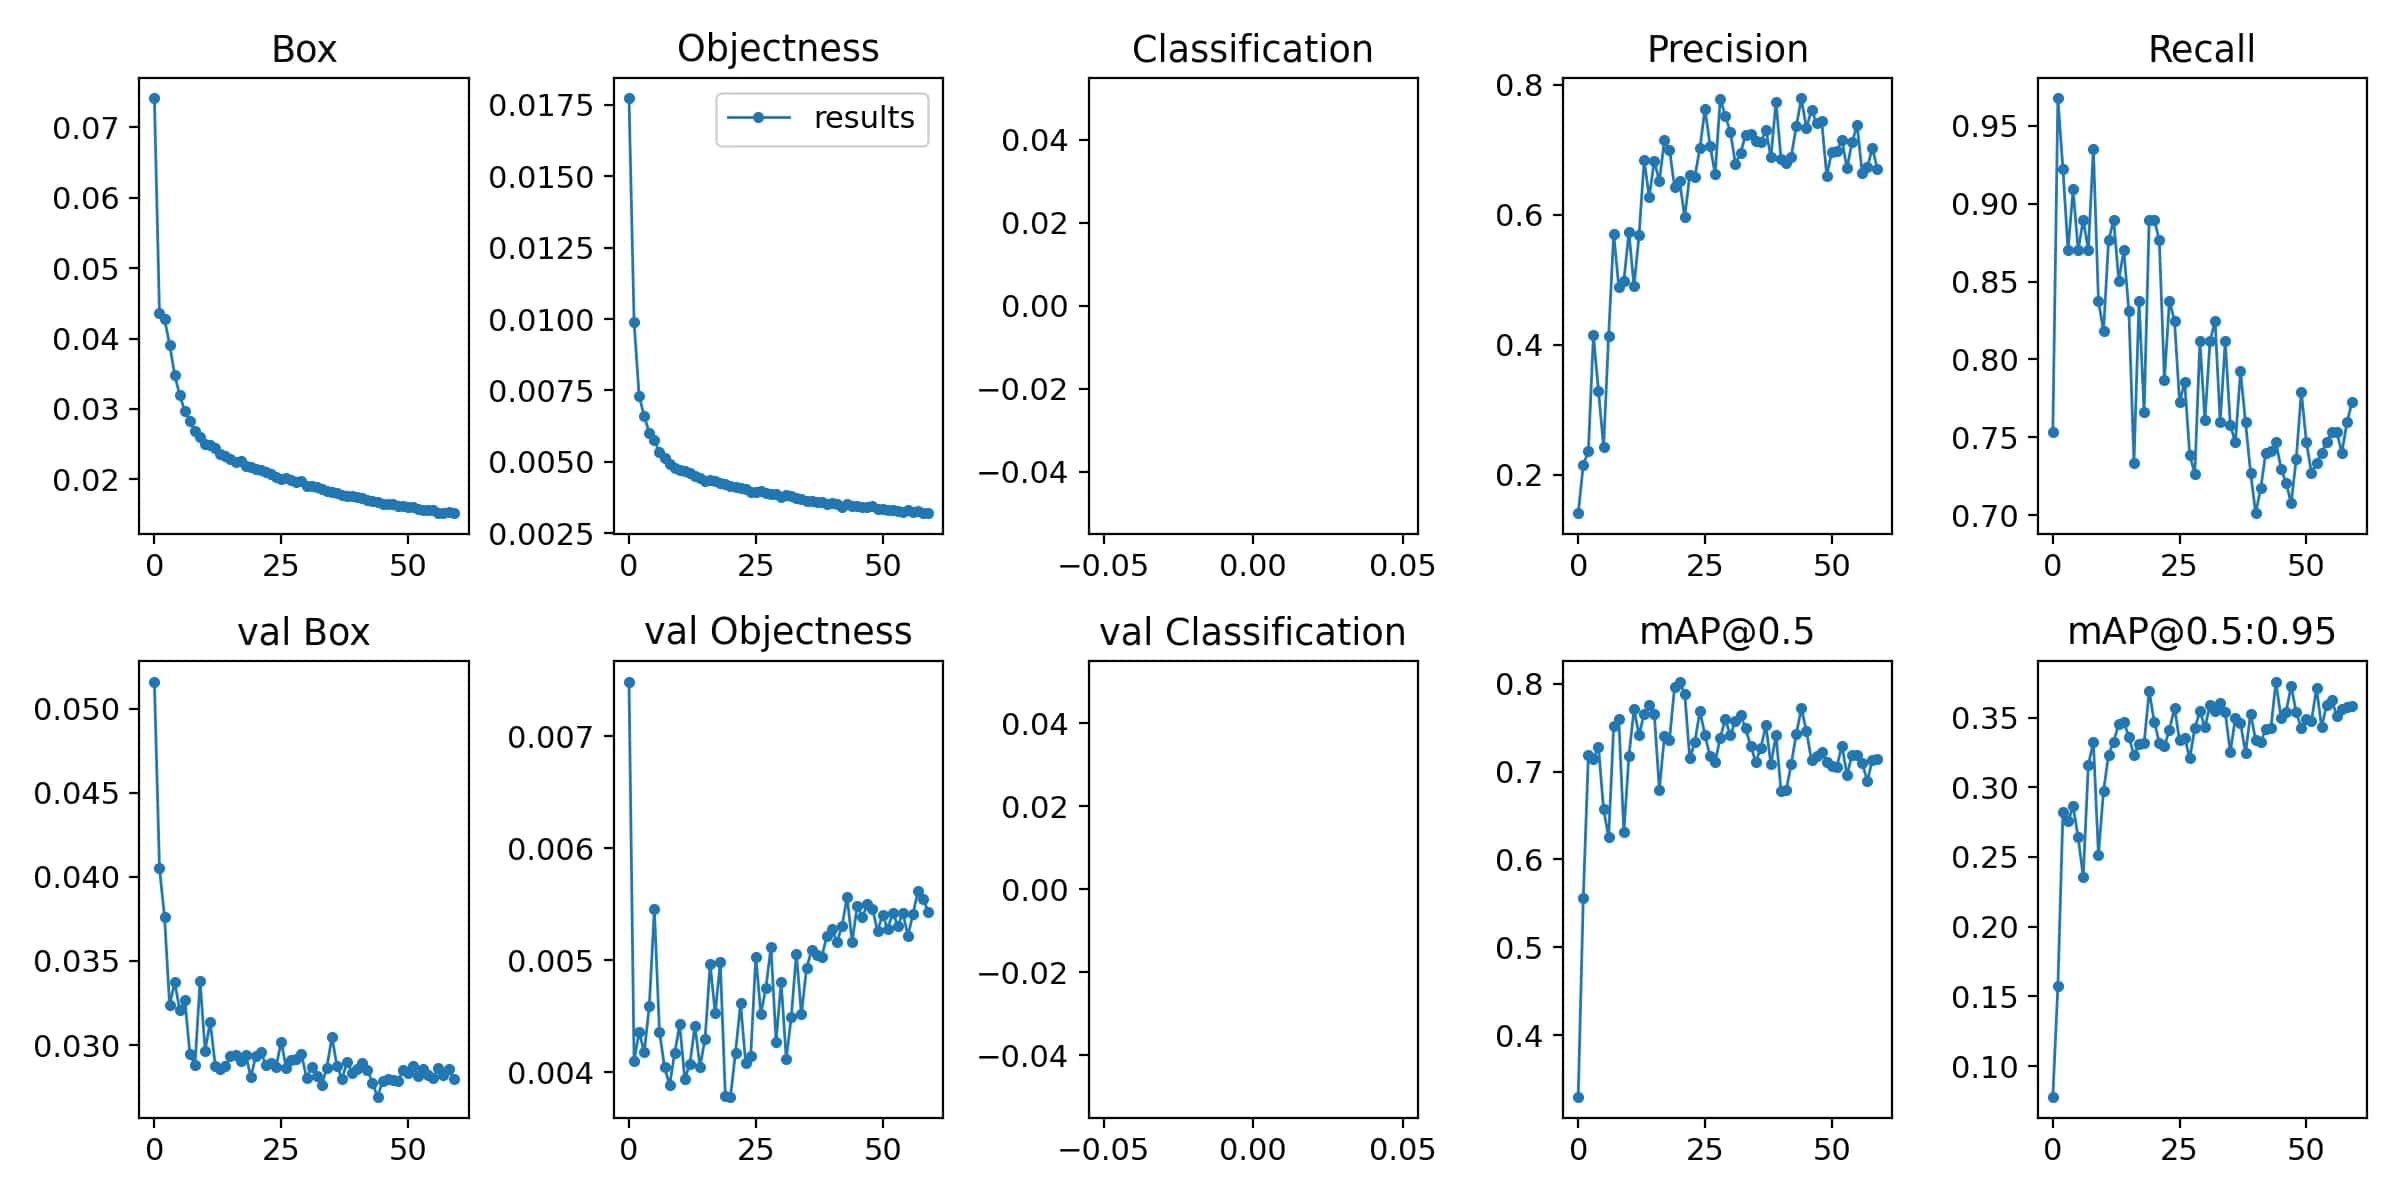
50 轮训练的效果图:
60 轮训练的效果图:
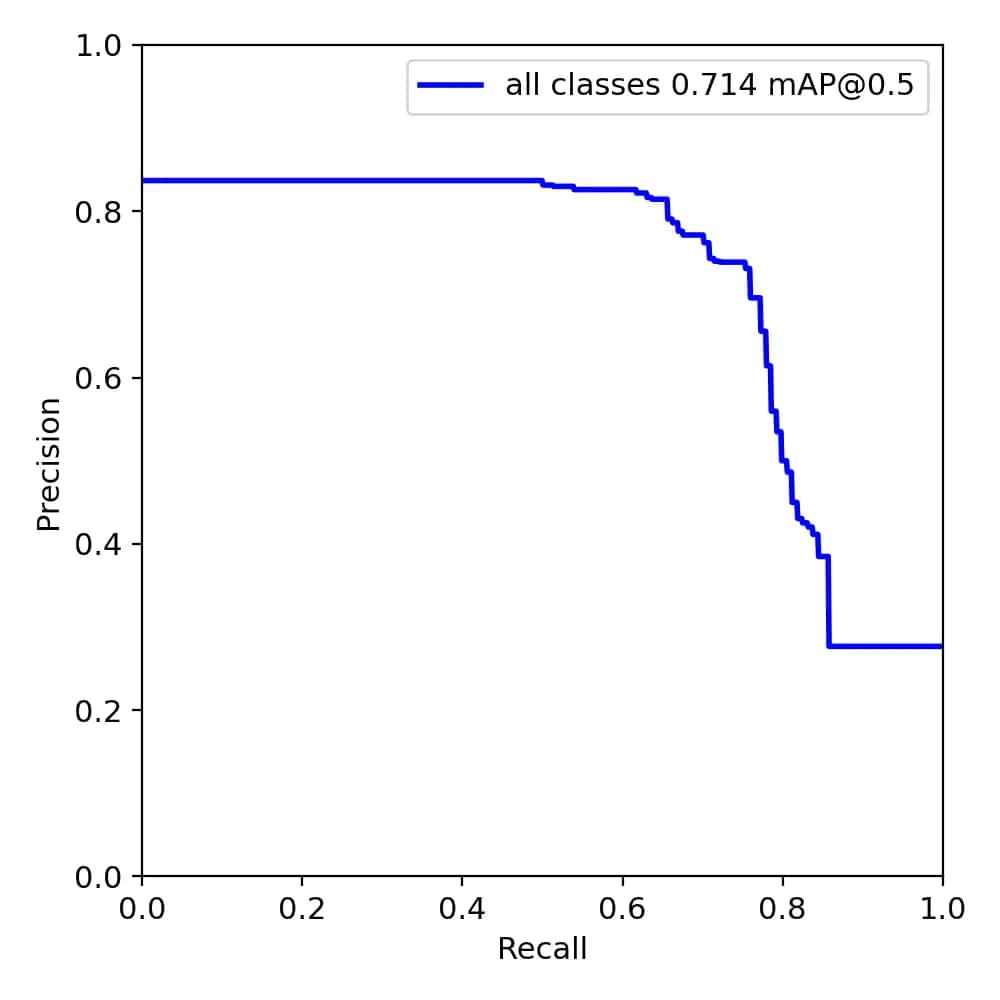
100 轮训练的效果图:
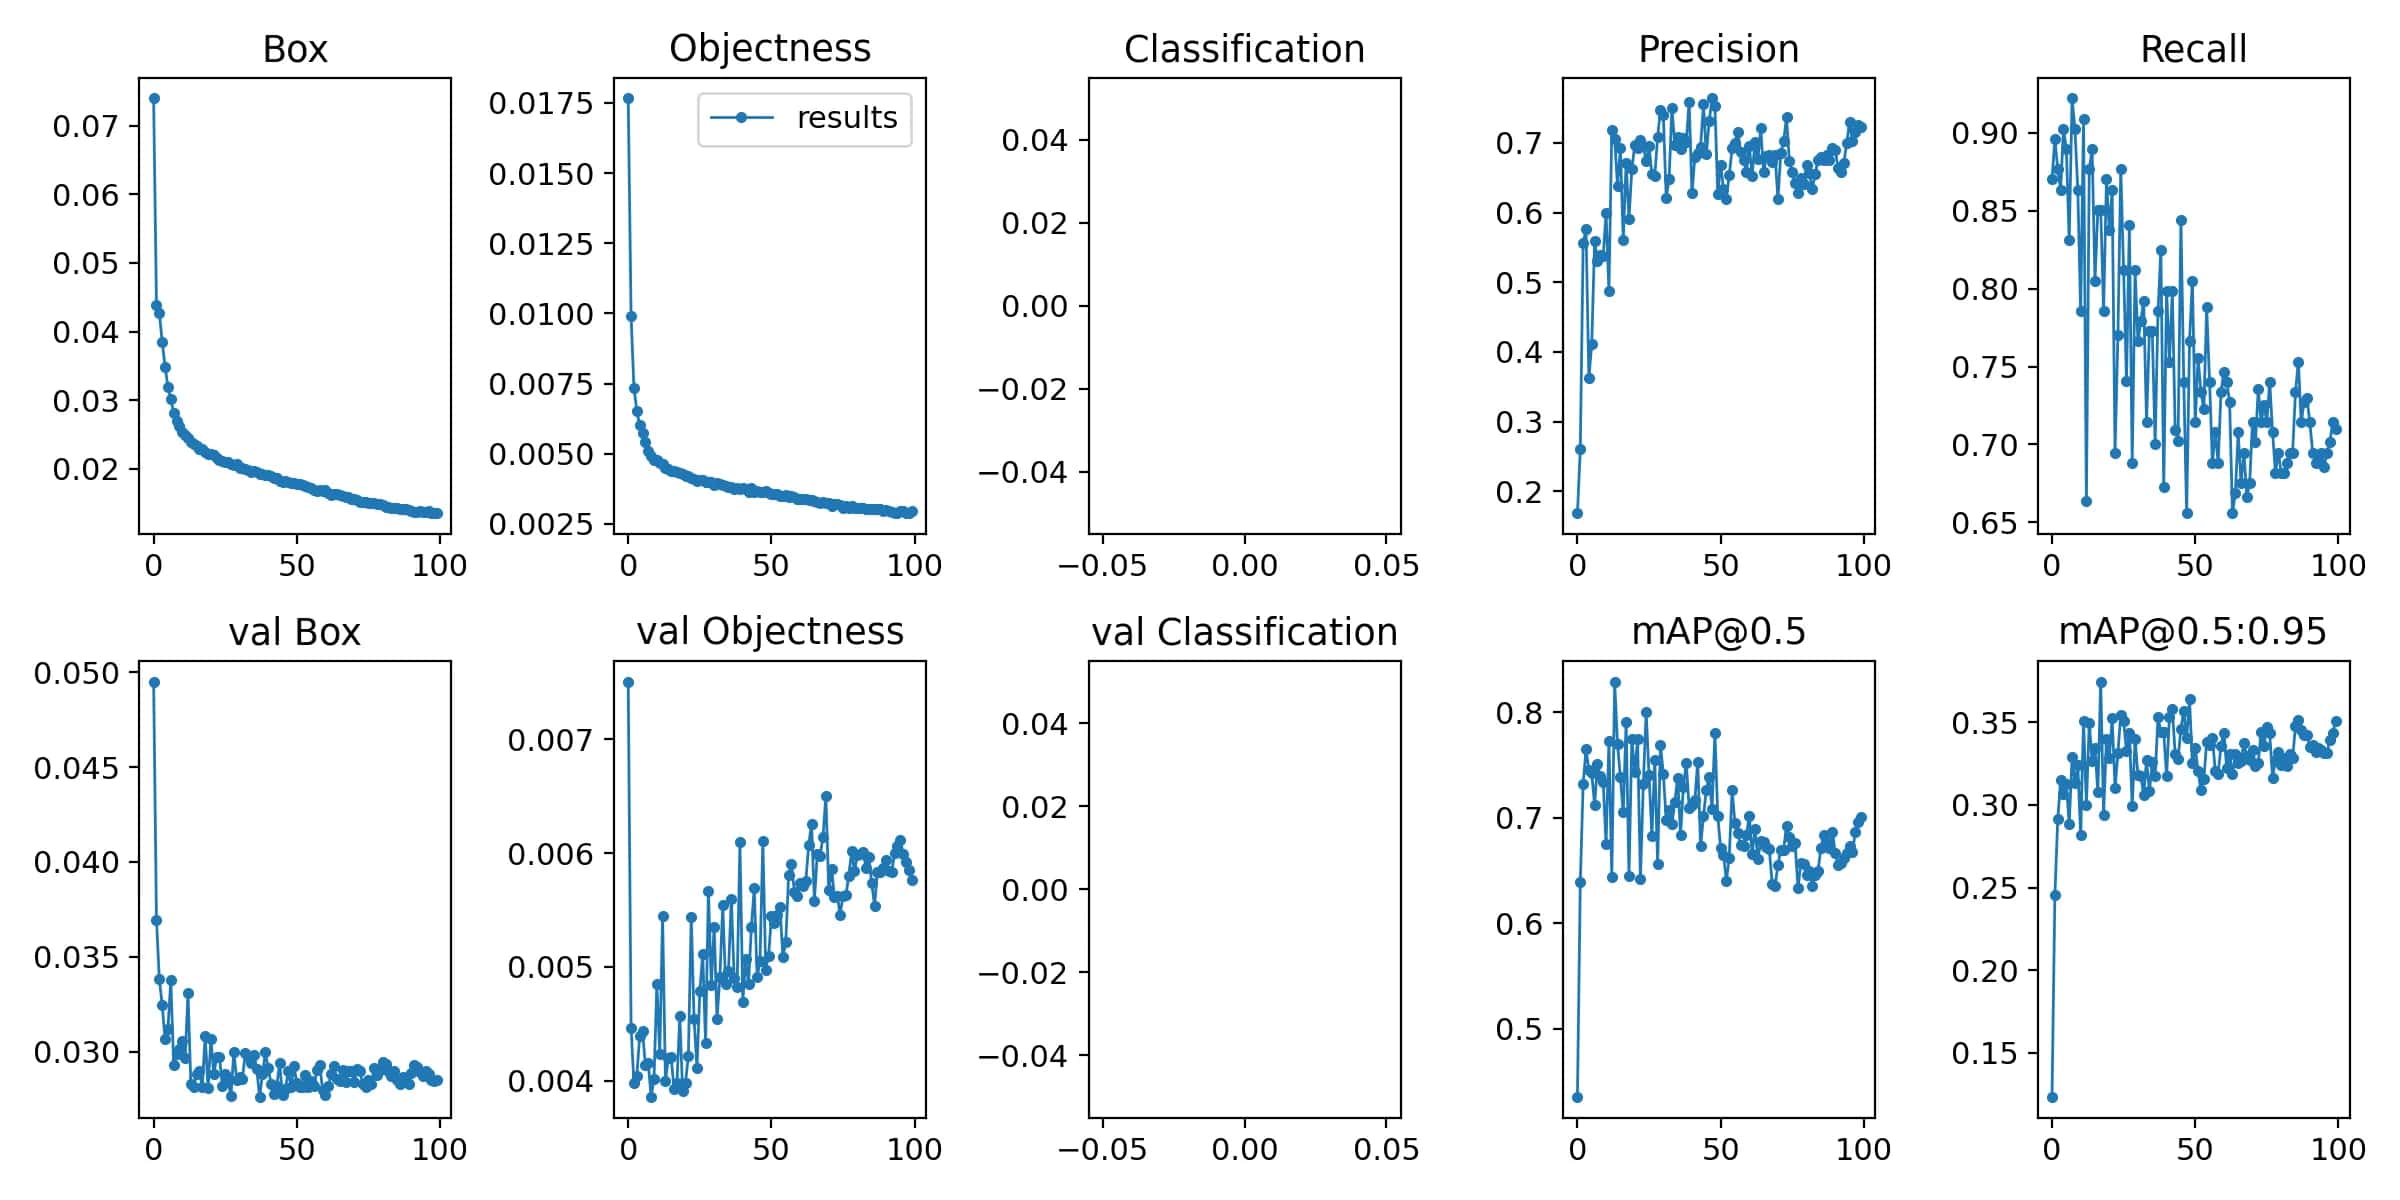
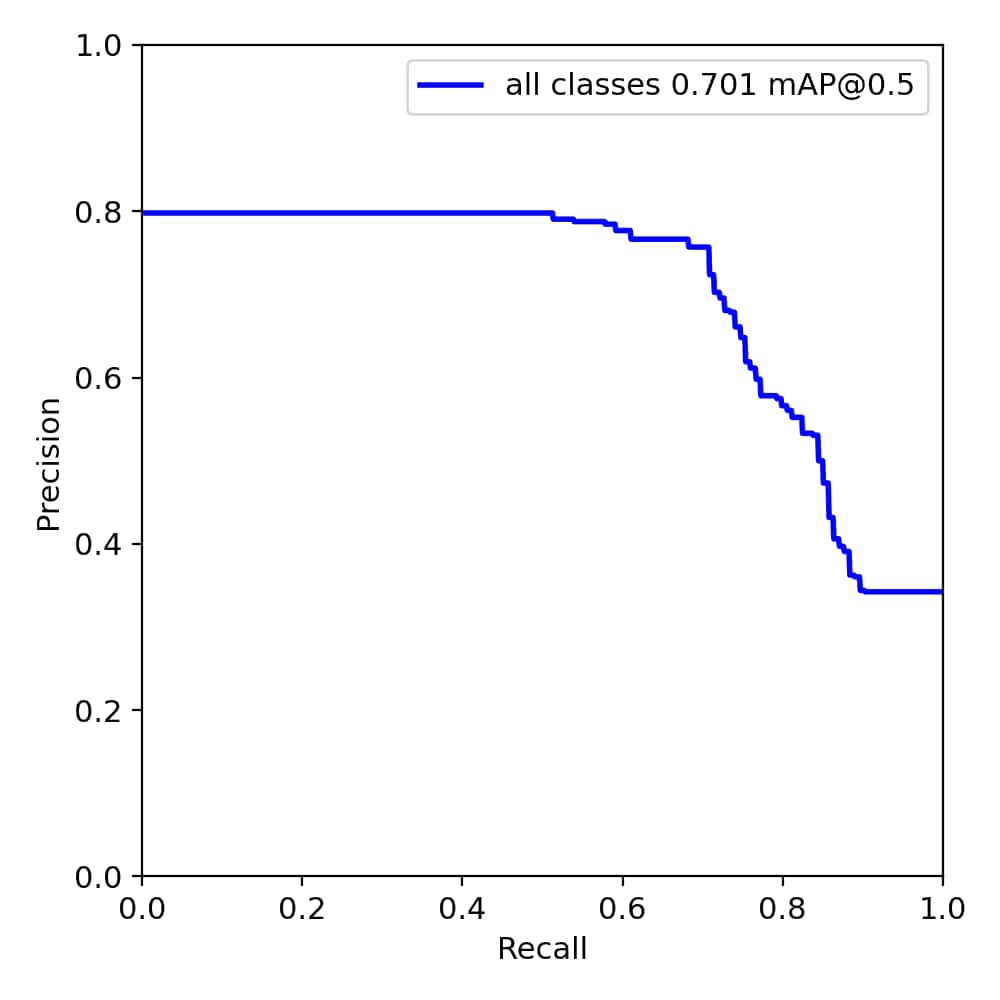
应该还是数据集的问题,出现了过拟合的现象。之后肯定还需要对数据集进行调整,另外由于采用的是最快的训练模型,在训练精度上肯定还有提升的空间。但之前在使用的时候,还出现了一些报错的情况,需要再花时间研究研究。
测试模块的编写
在设计 GUI 之前,需要初步完成图片和视频检测的程序编写
1.图片检测测试-核心代码摘录
def predict(img):
img = torch.from_numpy(img).to(device)
img = img.half() if half else img.float()
img /= 255.0
if img.ndimension() == 3:
img = img.unsqueeze(0)
t1 = time_synchronized()
pred = model(img, augment=False)[0]
pred = non_max_suppression(pred, opt.conf_thres, opt.iou_thres, classes=opt.classes,
agnostic=opt.agnostic_nms)
t2 = time_synchronized()
InferNms = round((t2 - t1), 2)
return pred, InferNms
def cv_imread(filePath):
# 读取图片
cv_img = cv2.imdecode(np.fromfile(filePath, dtype=np.uint8), -1)
if len(cv_img.shape) > 2:
if cv_img.shape[2] > 3:
cv_img = cv_img[:, :, :3]
return cv_img
def plot_one_box(img, x, color=None, label=None, line_thickness=None):
# Plots one bounding box on image img
tl = line_thickness or round(0.002 * (img.shape[0] + img.shape[1]) / 2) + 1 # line/font thickness
color = color or [random.randint(0, 255) for _ in range(3)]
c1, c2 = (int(x[0]), int(x[1])), (int(x[2]), int(x[3]))
cv2.rectangle(img, c1, c2, color, thickness=tl, lineType=cv2.LINE_AA)
if label:
tf = max(tl - 1, 1) # font thickness
t_size = cv2.getTextSize(label, 0, fontScale=tl / 3, thickness=tf)[0]
c2 = c1[0] + t_size[0], c1[1] - t_size[1] - 3
cv2.rectangle(img, c1, c2, color, -1, cv2.LINE_AA) # filled
cv2.putText(img, label, (c1[0], c1[1] - 2), 0, tl / 3, [225, 255, 255], thickness=tf, lineType=cv2.LINE_AA)
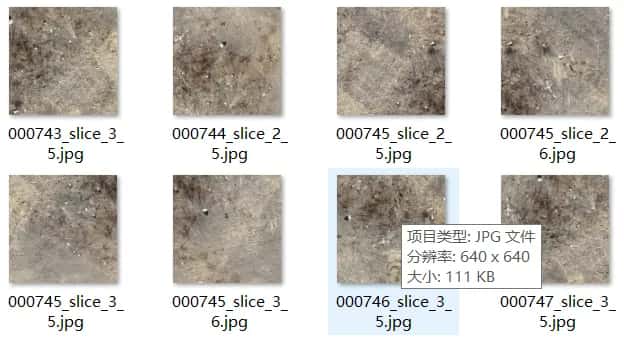
if __name__ == '__main__':
img_path = "./UI_rec/testpicture/000743_slice_3_5.jpg"
image = cv_imread(img_path)
image = cv2.resize(image, (640, 640))
img0 = image.copy()
img = letterbox(img0, new_shape=imgsz)[0]
img = np.stack(img, 0)
img = img[:, :, ::-1].transpose(2, 0, 1) # BGR to RGB, to 3x416x416
img = np.ascontiguousarray(img)
pred, useTime = predict(img)
det = pred[0]
p, s, im0 = None, '', img0
if det is not None and len(det): # 如果有检测信息则进入
det[:, :4] = scale_coords(img.shape[1:], det[:, :4], im0.shape).round() # 把图像缩放至im0的尺寸
number_i = 0 # 类别预编号
detInfo = []
for *xyxy, conf, cls in reversed(det): # 遍历检测信息
c1, c2 = (int(xyxy[0]), int(xyxy[1])), (int(xyxy[2]), int(xyxy[3]))
# 将检测信息添加到字典中
detInfo.append([names[int(cls)], [c1[0], c1[1], c2[0], c2[1]], '%.2f' % conf])
number_i += 1 # 编号数+1
label = '%s %.2f' % (names[int(cls)], conf)
# 画出检测到的目标物
plot_one_box(image, xyxy, label=label, color=colors[int(cls)])
# 实时显示检测画面
cv2.imshow('Stream', image)
# if cv2.waitKey(1) & 0xFF == ord('q'):
# break
c = cv2.waitKey(0) & 0xff
2.视频检测测试-核心代码摘录
def predict(img):
    img = torch.from_numpy(img).to(device)
    img = img.half() if half else img.float()
    img /= 255.0
    if img.ndimension() == 3:
        img = img.unsqueeze(0)

    t1 = time_synchronized()
    pred = model(img, augment=False)[0]
    pred = non_max_suppression(pred, opt.conf_thres, opt.iou_thres, classes=opt.classes,
                               agnostic=opt.agnostic_nms)
    t2 = time_synchronized()
    InferNms = round((t2 - t1), 2)

    return pred, InferNms


def plot_one_box(img, x, color=None, label=None, line_thickness=None):
    # Plots one bounding box on image img
    tl = line_thickness or round(0.002 * (img.shape[0] + img.shape[1]) / 2) + 1  # line/font thickness
    color = color or [random.randint(0, 255) for _ in range(3)]
    c1, c2 = (int(x[0]), int(x[1])), (int(x[2]), int(x[3]))
    cv2.rectangle(img, c1, c2, color, thickness=tl, lineType=cv2.LINE_AA)
    if label:
        tf = max(tl - 1, 1)  # font thickness
        t_size = cv2.getTextSize(label, 0, fontScale=tl / 3, thickness=tf)[0]
        c2 = c1[0] + t_size[0], c1[1] - t_size[1] - 3
        cv2.rectangle(img, c1, c2, color, -1, cv2.LINE_AA)  # filled
        cv2.putText(img, label, (c1[0], c1[1] - 2), 0, tl / 3, [225, 255, 255], thickness=tf, lineType=cv2.LINE_AA)


if __name__ == '__main__':
    #video_path = 1
    video_path = "UI_rec/testvideo/test.mp4"
    # 初始化视频流
    vs = cv2.VideoCapture(video_path)
    (W, H) = (None, None)
    frameIndex = 0  # 视频帧数

    try:
        prop = cv2.CAP_PROP_FRAME_COUNT
        total = int(vs.get(prop))
        # print("[INFO] 视频总帧数:{}".format(total))
    # 若读取失败,报错退出
    except:
        print("[INFO] could not determine # of frames in video")
        print("[INFO] no approx. completion time can be provided")
        total = -1

    fourcc = cv2.VideoWriter_fourcc(*'XVID')
    ret, frame = vs.read()
    vw = frame.shape[1]
    vh = frame.shape[0]
    print("[INFO] 视频尺寸:{} * {}".format(vw, vh))
    output_video = cv2.VideoWriter("./UI_rec/result/results.avi", fourcc, 20.0, (vw, vh))  # 处理后的视频对象

    # 遍历视频帧进行检测
    while True:
        # 从视频文件中逐帧读取画面
        (grabbed, image) = vs.read()

        # 若grabbed为空,表示视频到达最后一帧,退出
        if not grabbed:
            print("[INFO] 运行结束...")
            output_video.release()
            vs.release()
            exit()
        # 获取画面长宽
        if W is None or H is None:
            (H, W) = image.shape[:2]

        image = cv2.resize(image, (640, 640))
        img0 = image.copy()
        img = letterbox(img0, new_shape=imgsz)[0]
        img = np.stack(img, 0)
        img = img[:, :, ::-1].transpose(2, 0, 1)  # BGR to RGB, to 3x416x416
        img = np.ascontiguousarray(img)

        pred, useTime = predict(img)

        det = pred[0]
        p, s, im0 = None, '', img0
        if det is not None and len(det):  # 如果有检测信息则进入
            det[:, :4] = scale_coords(img.shape[1:], det[:, :4], im0.shape).round()  # 把图像缩放至im0的尺寸
            number_i = 0  # 类别预编号
            detInfo = []
            for *xyxy, conf, cls in reversed(det):  # 遍历检测信息
                c1, c2 = (int(xyxy[0]), int(xyxy[1])), (int(xyxy[2]), int(xyxy[3]))
                # 将检测信息添加到字典中
                detInfo.append([names[int(cls)], [c1[0], c1[1], c2[0], c2[1]], '%.2f' % conf])
                number_i += 1  # 编号数+1

                label = '%s %.2f' % (names[int(cls)], conf)

                # 画出检测到的目标物
                plot_one_box(image, xyxy, label=label, color=colors[int(cls)])

        # 实时显示检测画面
        cv2.imshow('Stream', image)
        image = cv2.resize(image, (vw, vh))
        output_video.write(image)  # 保存标记后的视频
        if cv2.waitKey(1) & 0xFF == ord('q'):
            break

        # print("FPS:{}".format(int(0.6/(end-start))))
        frameIndex += 1

        # if frameIndex >= total:  # 可设置检测的最大帧数提前退出
        #     print("[INFO] 运行结束...")
        #     output_video.release()
        #     vs.release()
        #     exit()
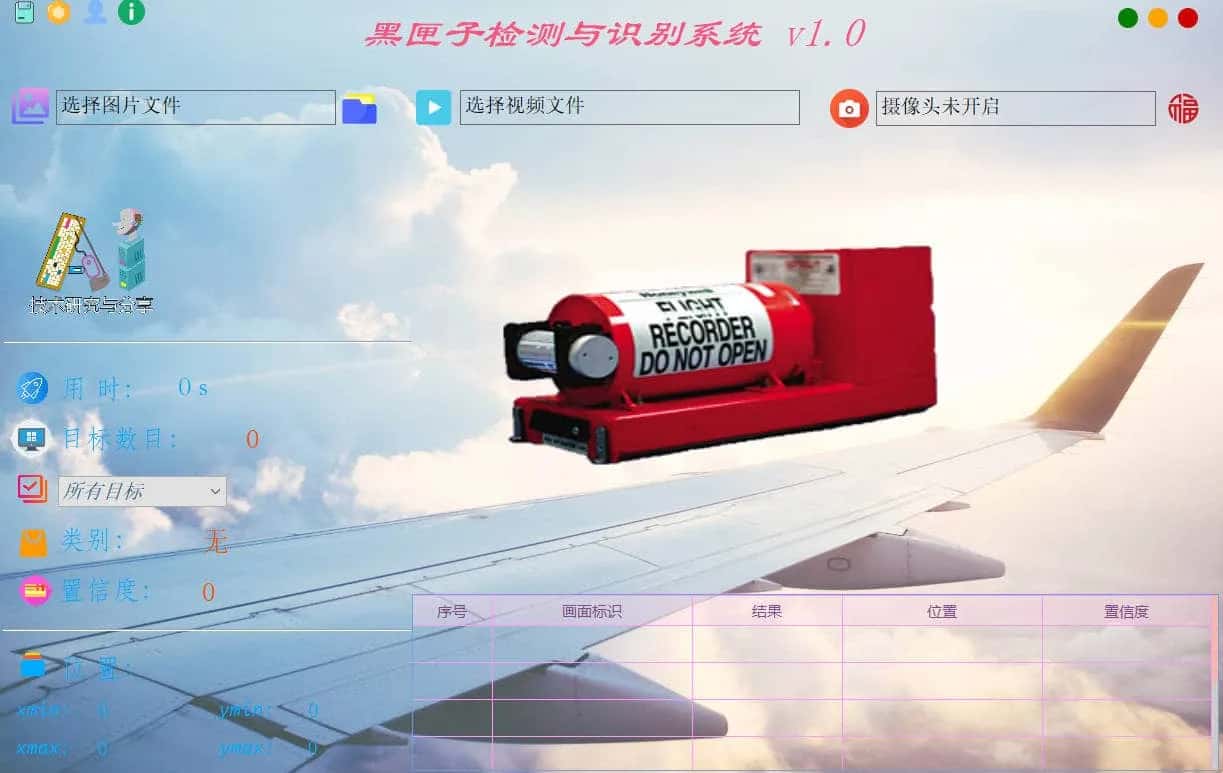
GUI 界面
主控程序:
# -*- coding: utf-8 -*-
# runMain.py
from sys import argv, exit
#这行代码从sys模块中导入了两个函数:argv和exit。argv是一个命令行参数的列表,当从终端运行Python脚本时,可以通过这个列表访问这些参数。exit函数用于退出Python程序。
from PyQt5.QtWidgets import QApplication
#这行代码从PyQt5的QtWidgets模块中导入了QApplication类。QApplication类管理GUI应用程序的控制流和主要设置,是所有基于Qt的GUI应用程序的起点。
from bboxRecognition import bbox_MainWindow
#这行代码从bboxRecognition模块(可能是一个自定义模块)中导入了一个名为bbox_MainWindow的类。这个类用于识别黑匣子。
if __name__ == '__main__':
#这行代码检查是否是直接运行这个脚本,而不是作为模块导入到其他脚本中。如果是直接运行,那么下面的代码块将被执行
    app = QApplication(argv)
#这行代码创建了一个QApplication实例,它是任何PyQt5应用程序的入口点。argv参数传递给QApplication,这样它就可以处理来自命令行的参数。
    win = bbox_MainWindow()
#这行代码创建了box_MainWindow类的一个实例,这个实例很可能是应用程序的主窗口。
    win.showTime()
#与时间相关的功能。
    exit(app.exec_())
#最后,这行代码启动了应用程序的主事件循环,通过调用exec_()方法。当事件循环开始后,应用程序将等待用户事件并响应他们。exit函数确保应用程序可以干净地退出,返回码将传递给exit,以便操作系统可以知道程序是正常退出还是发生了错误。
简要摘录核心功能代码:
1.启动 GUI 界面
#这段代码定义了一个名为bbox_MainWindow的类,它继承自QBeautyUI。这个类是一个GUI窗口,用于某种目标检测或者视频处理应用程序。
class bbox_MainWindow(QBeautyUI):
    #这行代码调用父类QBeautyUI的构造函数,确保继承的功能得到正确初始化。
    def __init__(self, *args, obj=None, **kwargs):
        super(bbox_MainWindow, self).__init__(*args, **kwargs)

        self.setupUi(self)  # 界面生成
        self.retranslateUi(self)  # 界面控件
        #这两行代码可能调用了在QBeautyUI中定义的方法,用于初始化和设置用户界面。
        self.setUiStyle(window_flag=True, transBack_flag=True)  # 设置界面样式
        #这行代码调用setUiStyle方法来设置窗口的样式,是使窗口透明或者应用其他视觉效果。
        self.path = getcwd()
        self.video_path = getcwd()
        #这里设置了两个路径变量,self.path和self.video_path,它们都被初始化为当前工作目录的路径。
        self.timer_camera = QtCore.QTimer()  # 定时器
        self.timer_video = QtCore.QTimer()  # 视频定时器
        self.flag_timer = ""  # 用于标记正在进行的功能项(视频/摄像)

        self.LoadModel()  # 加载预训练模型
        self.slot_init()  # 定义槽函数,这是Qt中用于处理信号和槽机制的函数,用于响应事件。
        self.files = []  #
        self.cap_video = None  # 视频流对象
        self.CAM_NUM = 0  # 摄像头标号
        self.cap = cv2.VideoCapture(self.CAM_NUM)  # 屏幕画面对象
        #这几行代码初始化了一些变量,包括一个空列表self.files,一个空的视频流对象self.cap_video,一个摄像头编号self.CAM_NUM,以及使用cv2.VideoCapture创建的摄像头视频捕获对象self.cap。
        self.detInfo = []
        self.current_image = []
        self.detected_image = None
        # self.dataset = None
        self.count = 0  # 表格行数,用于记录识别识别条目
        self.res_set = []  # 用于历史结果记录的列表
        self.c_video = 0
        self.count_name = ["黑匣子"]
        self.count_table = []
        #这一部分初始化了更多的变量,包括用于存储检测信息、当前图像、检测到的图像、结果集和其他相关数据的列表和变量。
- 读取预训练模型
def LoadModel(self, model_path=None):
        """
        读取预训练模型
        """
        parser = argparse.ArgumentParser()
        parser.add_argument('--weights', nargs='+', type=str, default='../weights/best.pt',
                            help='model.pt path(s)')  # 模型路径仅支持.pt文件
        parser.add_argument('--img-size', type=int, default=480, help='inference size (pixels)')  # 检测图像大小,仅支持480
        parser.add_argument('--conf-thres', type=float, default=0.25, help='object confidence threshold')  # 置信度阈值
        parser.add_argument('--iou-thres', type=float, default=0.45, help='IOU threshold for NMS')  # NMS阈值
        # 选中运行机器的GPU或者cpu,有GPU则GPU,没有则cpu,若想仅使用cpu,可以填cpu即可
        parser.add_argument('--device', default='0',
                            help='cuda device, i.e. 0 or 0,1,2,3 or cpu')
        parser.add_argument('--save-dir', type=str, default='inference', help='directory to save results')  # 文件保存路径
        parser.add_argument('--classes', nargs='+', type=int,
                            help='filter by class: --class 0, or --class 0 2 3')  # 分开类别
        parser.add_argument('--agnostic-nms', action='store_true', help='class-agnostic NMS')  # 使用NMS
        self.opt = parser.parse_args()  # opt局部变量,重要
        out, weight, imgsz = self.opt.save_dir, self.opt.weights, self.opt.img_size  # 得到文件保存路径,文件权重路径,图像尺寸
        self.device = select_device(self.opt.device)  # 检验计算单元,gpu还是cpu
        self.half = self.device.type != '0'  # 如果使用gpu则进行半精度推理
        if model_path:
            weight = model_path
        self.model = attempt_load(weight, map_location=self.device)  # 读取模型
        self.imgsz = check_img_size(imgsz, s=self.model.stride.max())  # 检查图像尺寸
        if self.half:  # 如果是半精度推理
            self.model.half()  # 转换模型的格式
        self.names = self.model.module.names if hasattr(self.model, 'module') else self.model.names  # 得到模型训练的类别名
    """
    这段代码定义了一个名为 `LoadModel` 的方法,它用于加载预训练的机器学习模型,并对模型进行一些初始化设置。这个方法是用于深度学习模型的推理(inference)的准备工作。具体来看,方法的功能包括:
1. **参数解析**:
   使用 `argparse` 库来解析命令行参数。这些参数包括模型权重文件的路径、输入图像的大小、置信度阈值、IOU阈值、计算设备(CPU或GPU)、结果保存目录、类别过滤以及是否使用类别无关的非极大值抑制(NMS)。
2. **设置默认参数**:
   如果在调用方法时没有指定 `model_path`,它会使用默认的参数设置。
3. **选择计算设备**:
   使用 `select_device` 函数(这个函数在代码中没有给出,但可以推断它的功能是选择使用CPU还是GPU进行计算)。
4. **模型加载**:
   使用 `attempt_load` 函数加载模型,这个函数可能是一个自定义函数或者来自某个库,用于加载模型并将其映射到指定的计算设备上。
5. **图像尺寸检查**:
   使用 `check_img_size` 函数确保输入图像的尺寸与模型的步长兼容。
6. **半精度推理**:
   如果计算设备是GPU,则将模型转换为半精度(float16),这样可以加快推理速度并减少内存使用。
7. **类别名称处理**:
   获取模型训练时的类别名称,并且如果这些名称在 `Chinese_name` 字典中有对应的中文名称,就替换为中文名称。
8. **颜色分配**:
   为每个类别分配一个颜色,这通常用于在图像上绘制检测结果。如果类别的数量没有超过预定义的颜色列表 `color`,它会使用这些颜色;否则,会随机生成颜色。
9. **预推理**:
   创建一个零图像张量,并通过模型进行一次前向传递,这通常是为了让模型在实际推理之前“热身”,确保CUDA核心已经加载,从而在后续的推理中能够更快。
这个方法是深度学习模型部署的常见步骤的集合,用于准备模型进行后续的图像处理和对象检测任务。代码中提到的一些函数和变量(如 `select_device`, `attempt_load`, `check_img_size`, `Chinese_name`)没有在这段代码中定义,所以它们的具体实现细节是未知的,但从上下文中可以推测它们的大致功能。
3.融合检测程序-如上面所呈现
后续多模态的融合
后续完成基础可见光条件的训练之后,还要尝试进行多光谱的融合,提高模型的精确度。
20240413 会议纪要
- 明确可检测的图片,进行界限的区分;
- 在可见光条件下,界定遮挡比例
- 黑匣子出现极端位置(例如垂直放置情况下),识别灵敏度的控制
- 漏检率不能低于 5%
- 提高验证集的数量,要有统计结果,配合导出检测结果
- 更改 GUI 界面的配色
- 使用多光谱网络模型
- 预计五月初开始论文的撰写
总结
这篇文章随进度更新,用于记录在毕设过程中遇到的心得和问题。